|
|
Imperial Glory on sale
| |||

The below is an unofficial, unauthorised pseudo-historical account of a battle featured within the Black Library novel Imperial Glory. This is a derivative work of intellectual property owned by Games Workshop and may not be used in any commercial activity without permission from that company.
The Battle of HighpointThe Battle of Highpoint was fought on 072660M41 on the undeveloped continent of Tswaing on the Imperial planet Voor. It was the largest battle of the Voor Pacification operation performed as part of the Ellinor Crusade (639M41-699M41) and resulted in the defeat of the feral ork tribe known as the Stone Smashas by the 11th Brimlock Dragoons and the capture of the Brimlock's overall campaign objective: the crashed ork rok codenamed 'Brutal Fury'. BackgroundThe 11th Brimlock Dragoons were assigned to the planet Voor to investigate reports of an ork infestation resulting from a crashed rok and eliminate any survivors. Colonel Arbulaster, in command of the 11th, began the campaign by landing a deployable outpost vessel (DOV) at a distance away from the rok crash-site. After performing preliminary reconnaissance to establish that a significant ork presence had survived at the crash-site, Arbulaster ordered his regiment through the jungle on a direct path towards it. The 11th's advance through the jungle was slowed by the necessity of moving their attached armoured and self-propelled artillery pieces through the broken terrain. During their advance, however, they went largely unmolested by the independent savage ork tribes in the area who avoided direct contact with the Brimlock column due to the day-time presence of the regiment's tanks and other heavy support. Raid on Fort ElizaThe night before the battle, an ork tribe of an estimated 3,000 warriors led by Warlord Biggunz attempted a night attack on the 11th's final transit encampment: Fort Eliza. Though the fort's defenders lacked the heavy support vehicles that had returned back to the outpost, they were able to repel the attack and kill a majority of the attackers with the loss of approximately 200 men. The ork casualties significantly included Biggunz himself, who was killed during a valkyrie rocket strike on an artillery piece salvaged from the rok. The death of Biggunz resulted in the dispersion of his force as tired orks returned in small groups to the xenos-infected land surrounding the crater. Forces11th Brimlock
At the Battle of Highpoint, the 11th consisted of: § 2 companies of mechanised infantry under the command of Major Brooce and Captain Deverril § 6 companies of foot infanty (Majors Roussell & Stanhope; Captains Colquhoun, Everson, Fergus & Gomery) § 2 companies of horse dragoons under the command of Captain Ledbetter § 1 company of Leman Russ tanks and variants under the command of Captain Drum § several pieces of self-propelled artillery under the command of Major Rosa § 1 platoon of sappers with construction sentinels under the command of Lieutenant Mulberry In total, Colonel Arbulaster had approximately 1,000 men at his command. Note that, due to atmospheric conditions, the squadron of valkyries assigned to the regiment by the navy were unable to take part in the battle. The Stone Smashas
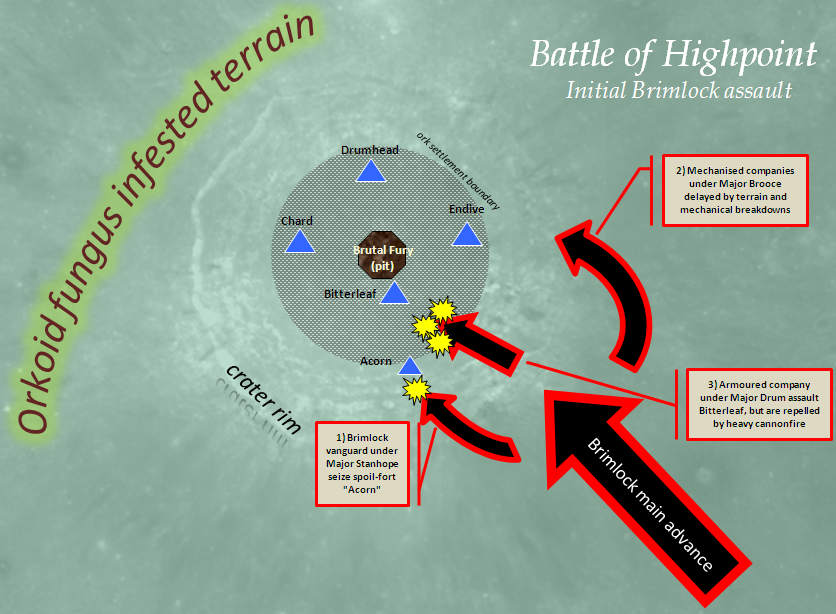
The death of Biggunz created a leadership vacuum at the top of the tribe. Typically, the most senior nob, Randakka, would have swiftly taken charge, however due to the confusion over the nature of Biggunz's end and the dispersal of his army, news of his death had not reached Randakka by the time of the Brimlock attack. As a result the Smashas' responses to the 11th's attack were localised, without any overall strategic direction. The Battle of Highpoint was a classic clash, therefore, between outnumbered but disciplined Brimlock guardsmen against a savage but disorganised foe. BattlefieldThe impact of the rok codenamed 'Brutal Fury' on the jungles of the Tswaing continent created a crater approximately 1 kilometre across and igniting the jungle for several kilometres around. Within that area, the alien spores swiftly asserted itself over the devastated native flora and fauna so that, six months later, the area around the crater was carpeted with orkoid fungal species. The ground in particular was covered with small mushrooms sprouting from a thin coating of algae. This proved no obstacle for the infantry, but the loose soil slowed the tracks of leman russ tanks, chimeras and salamanders. More significantly, the spores released by these organisms when they were crushed were swept up in the air intakes for the engines. While light, the spores were very tough and these and other debris were a significant cause of the high number of breakdowns the 11th experienced through the battle. The crater itself was dominated by several landmarks, the foremost being the ork dug pit in its centre. During impact, the earth displaced by the rok fell back on top of it, burying it underground. The primary enterprise of the Stone Smashas tribe was the excavation of the rok. The centre of the crater was a giant pit, leading down to where the rok had settled. The spoil taken from the excavation was deposited in several piles around the pit. As each mound grew above a certain size it was abandoned and a new pile was started. The Stone Smashas then built rudimentary forts on the top of each to strengthen their defence of the crater. These spoil-forts would become key objectives for Arbulaster and he named each as part of his battleplan. The four fortified mounds were Acorn, Chard, Drumhead and Endive. The closest to the crater, with structures but without apparent fortifications, was labelled Bitterleaf. While it is uncertain whether the Stone Smashas ever understood the true nature of the rok as a space-going craft, their control of the rok was vital to their dominance over the other tribes around them. The rok was the only source open to the orks of metal weapons and, through further digging, they were able to salvage several of the smallest cannon from the war machines inside for use as as artillery pieces. Preliminary manoeuvresIn the early hours of the day following Biggunz’s raid on Fort Eliza, the Brimlocks began cutting their way through the last part of the Tswaing jungle took the Brimlock column. By noon, they had reached the fungal plain and began to cross. They encountered little orkish resistance. The orks there were primarily survivors of the previous night's attack who had straggled back into the fungus to rest and they were quickly overwhelmed by Ledbetter's cavalry and Drum's tanks. Upon reaching the wide crater caused by the rok’s impact, the Brimlock vanguard seized a portion of the ridge and held it against instinctive ork assaults while the rest of the Brimlock column deployed. Arbulaster's battle plan revolved around capturing the spoil-forts. From these, his forces would secure the crater and be able to annihilate any enemy forces remaining between them. To take maximum advantage of the surprise, he planned to assault three of the spoil-forts simultaneously. His primary assault was to be against Bitterleaf, the central heap, from which he could dominate the crater. He selected three infantry companies and a detachment of tanks under the decorated Major Roussell for the first wave, and placed himself with that main force. The main assault was preceded by two preliminary attacks: in the first, an infantry company under Major Stanhope assaulted the closer spoil-fort named Acorn which stood to Bitterleaf's left; in the second, two mechanised infantry companies under Major Brooce were to attack Endive, standing to to Bitterleaf's right. These smaller attacks were designed to seize the two smaller forts from which the main assault could be supported and its flanks protected. Capture of AcornDrum’s armoured company was able to provide covering fire while Stanhope’s company scrabbled up the slope to make the assault. Acorn, being the smallest of the spoil-forts, was lightly defended and the guns of the tanks and the heavy weapon squads managed to scour much of the top of the mound clear. Stanhope's company advanced unopposed until they reached the crest of Acorn and were attacked by the orks concealed on the reverse slope. Brimlock discipline was able to best the ragged ork charge and, having repelled the greenskins, Stanhope's company dug in to the top of Acorn. They were able to provide supporting fire and observation throughout the rest of the battle.
Delays at EndiveWhile Arbulaster redeployed Drum’s tanks to the main assault force aimed at Bitterleaf, the two mechanised infantry companies under Major Brooce were struggling. They had taken the long route around the outside of the crater so as to strike Endive from the opposite side. Arbulaster's intention was that the initial attack on Acorn would draw the pugnacious orks away from the further mounds, weakening their presence on Endive. The mechanised companies would then be able to seize it, fortify it and spur the orks into costly counter-attacks uphill, bleeding them further. As it resulted, the robust orkish spores and fungal fragments sucked into the chimera engines caused a litany of mechanical breakdowns in the oft-repaired Brimlock machines. Ultimately, by the time the attack on Endive went ahead, the battle was so engaged around Bitterleaf that no ork counter-attack ever came. First Assault on BitterleafThe first assault on Bitterleaf began within half an hour of the fall of Acorn. Drum's tanks were also suffering from mechanical difficulties and a third of the robust lemans were clogged with debris and desperately being cleaned out by their crews. The remainder of the armoured company lead the first assault, driving abreast and flattening a wide path through the ramshackle xenos buildings as they went. On those few occasions that tanks became wedged, the Stone Smashas emerged from the sides with heavy hammers and picks to try and bash them open, but Roussell’s infantry following close behind drove them off far enough for the vehicles’ battle cannons and close-quarter weaponry to be effective. Appearing invulnerable, Drum's company rolled towards the largest spoil-fort closest to the centre of the crater. The Stone Smashas, however, were not completely defenceless in the face of the Brimlock's armoured might. Mixed in amongst the leering xenos icon towers on Bitterleaf were three mega-cannon salvaged from the rok, the elder brothers of the mobile artillery piece used in the raid on Fort Eliza. Though the Stone Smashas still fought with choppas and clubs, the eerie innate orkish aptitude for technology had emerged in some of their kind and they had restored the mega-cannon to their basic function: making things go boom. The Stone Smashas had never fired the mega-cannon in anger, only in individual idiocy. The mere sound of them had convinced the feral tribes which existed outside the crater not to challenge the Stone Smasha's supremacy. Now, however, they were up against a more determined enemy, the mega-cannon were finally unleashed. Their wild first volley, by fluke or skill, annihilated one of the armoured company’s tanks and immobilised another. Caught by surprise, Drum was unwilling to sacrifice his remaining four operational tanks in an unsupported rush and halted the assault. The tanks went into reverse, covering the retreat of the main infantry force behind him from the ork warbands threatening on either side. The armoured company's reverse was painfully slow. As they crept back to the attack's start-line, two more tanks were disabled and abandoned and another was destroyed. Whilst many of the disabled tanks could be recovered after, the armoured company was eliminated as a fighting force for the remainder of the battle. It was a loss to Arbulaster, but not a fatal one. He knew what every Guard commander knew was the correct the course of action when faced with an unarmoured foe holding a static position: call up the artillery. Shell-storm on BitterleafWith all of Major Rosa’s self-propelled and portable artillery pieces, Arbulaster shelled the top of Bitterleaf for a full hour. Major Rosa's disciplined fire gradually obliterated first the mega-cannon and then every trace of life from the summit of the spoil-fort. Arbulaster continued the barrage, burning through the regiment's reserves, even as the light began to fade. Some of his officers started to question why, given that Bitterleaf was open for capture, the colonel was content to have his assault force sit on the defensive. The Stone Smashas had not been idle, even with shells bursting around them the largest orks had fought brief, brutal duels to determine new leaders. Once they had established themselves, even though the approaching night brought with it the chance for them to disengage and reorganise their forces, neither the new Stone Smasha bosses nor their boyz could endure the inactivity.
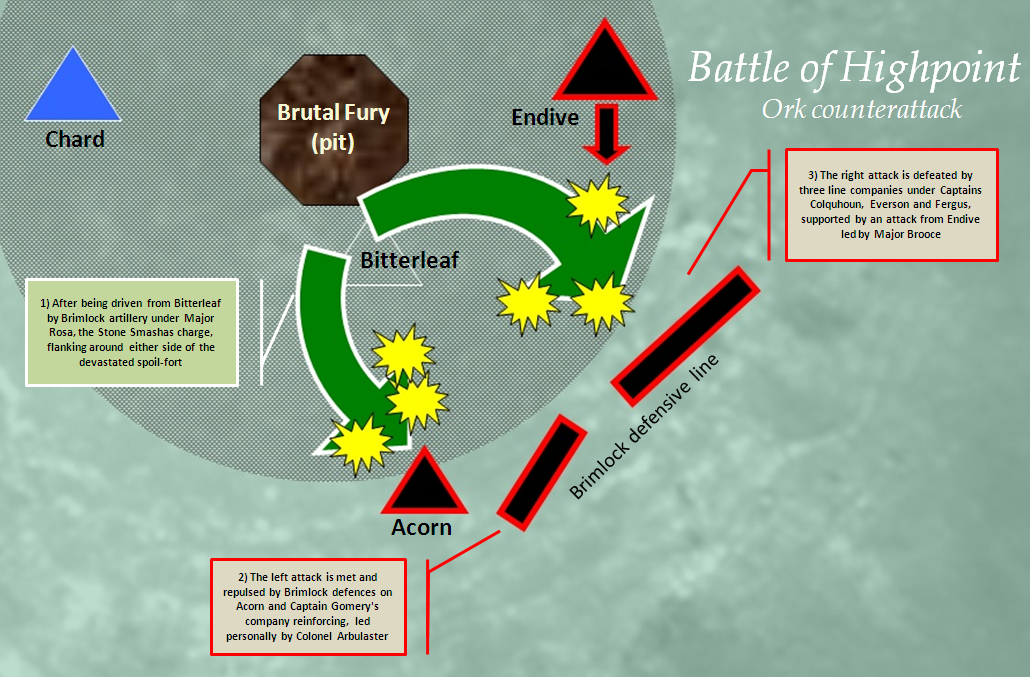
Stone Smasha resurgenceWith their blood high and with new bosses at their head, the Stone Smashas reverted to their basest instinct: to attack. The remaining warriors of the tribe had clustered in the cover behind Bitterleaf and now emerged in two giant pincers around the devastated spoil-fort. They poured straight towards their tormentors: the Brimlock artillery beside Acorn. Arbulaster deployed the bulk of his remaining forces, four companies, to form line in front of the orks' target. He deployed three of them to hold the right pincer, while Gomery's company was sent left to support the defences on Acorn. Knowing that this was where the battle would be lost or won, Arbulaster placed himself in the front line, at the hinge between Gomery's company and Acorn, so as to ensure the flank held. The left pincer was cut down as the orks struggled up the slope of Acorn for the second time that day. On the right, the orks threw themselves at the solid Brimlock line, but their charge was in turn outflanked by an attack from Major Brooce’s companies who had quietly taken control of Endive. The Stone Smasha's assaults collapsed. A few of them, firing captured Voorjer rifles, scored hits, most notably against the regimental commissar accompanying Arbulaster, but the main body of the pincers never even got close to the Brimlock line. For all their ferocity, the orks simply no longer had the numbers to carry them into close combat where they might massacre their enemies hand to hand. Within thirty minutes of their appearance from the shadow of Bitterleaf, half the ork warriors had fallen and the remainder were either fleeing or being surrounded and destroyed. In the fading light, the Brimlock line advanced after the remnants of the Stone Smashas, finally taking Bitterleaf and raising their flag over the ork rok. Aftermath and AnalysisThe day before the battle, the Stone Smashas were the undisputed masters of the savage ork tribes of Tswaing. Twenty four hours later, they had been annihilated as a military force and the rok crater at the heart of the ork realm was in Brimlock hands. Ork casualties were impossible to calculate with certainty, but it is estimated that including the casualties in the night-raid on Fort Eliza possibly as much as 70% of the tribe was dead. The remainder had fled, either from the crater or earlier in the day from the fungal plain around it. The ork survivors scattered, some falling foul of the savage ork tribes around the crater eager for revenge against their former overlords, but many were able to enlist with these other tribes instead. This peculiarly orkoid absence of malice or resentment on both sides prevented a further weakening of the overall ork strength on Tswaing. In fact, the experience of some of the former Stone Smashas against the Brimlock guardsmen would prove invaluable to the tribes in their next confrontation with the foe. Certainly, the annihilation of the Stone Smashas convinced the other tribes of the strength of their adversary, leading them to put aside their previous squabbling and allowing the elevation of the warlord known as Choppa. Despite the hard fought nature of the battle, the casualties for the 11th Brimlock were disproportionately light. The vast majority of the Stone Smasha warriors were equipped with clubs, cudgels and blades and the orks were never able to effectively bring their superior close quarter strength to bear. The 11th Brimlock's most serious loss was the destruction of the tanks of the armoured company. All in all, the Brimlocks had suffered approximately 200 dead and wounded during the night raid on Fort Eliza and the same during the Battle for Highpoint, leaving the regiment with a strength of 800, including all their artillery pieces and many of their chimeras. The regiment encamped in the crater the night after the battle, burning the bodies of the ork dead, and commenced work the next day to demolish the crashed rok. In the battle, Colonel Arbulaster demonstrated a near-textbook example of aggressive 'bite and hold' tactics against opponents with greater numbers, that were individually powerful yet strategically naive. Arbulaster used the innate orkish preference to attack and unwillingness to retreat, often their greatest strength against inexperienced opponents, against them. Initially by the capture of Acorn and then in the artillery barrage of Bitterleaf, he goaded the orks into attacking up slopes against positions his troopers had had time to prepare. Arbulaster also enjoyed good luck in the death of the Stone Smasha Warlord Biggunz at Fort Eliza. Though he could not have known of the death (indeed the orks in the crater were never certain either), he fully exploited the disarray of the ork forces in the aftermath of the raid by using the superior organisation and discipline of his veteran regiment to move against their objective a scant few hours after the Brimlocks themselves had been assaulted. Perhaps more than a thousand orks, still reeling from being repulsed at Eliza, were scattered on the fungal plain by the Brimlock column and played no part in the battle. Had Arbulaster waited even a day to reorganise his forces, the Stone Smasha orks would have reformed, chosen new leadership and been a far more formidable opponent. While Arbulaster had demonstrated great understanding of ork battlefield tactics, the events after the battle showed a fundamental lack of understanding of his enemy. Having captured their strategic objective, virtually annihilating its defenders in the process, Arbulaster concluded that the campaign was over. Some have commented that his thinking was most likely skewed by the regiment's prior battles during the crusade, which had been against a xenos empire known as the Karthadasim. The Karthasdasim focused their strategy around their capital cities, pulled in all forces to defend them, and capitulated once they were lost. Even if Arbulaster had known of the large number of orks remaining in the formerly subjugated tribes beyond the crater, he may have discounted them, believing that with the rok in his hands, their morale would be broken and that the threat they represented was negligible. Others have speculated that Arbulaster was driven by personal reasons to close the campaign upon the capture of the rok, often attributing it to personal greed in desiring to seize good land on the populated continents of Voor; still more cite obscure fragmentary references that there was a secret second phase to the Voor Pacification operation that was never disclosed to the governor. Whatever the reason, Arbulaster's subsequent actions squandered the momentum of his crushing victory at the Battle of Highpoint and handed the initiative of the Voor campaign back to the orks. This document is completely unofficial and in no way endorsed
by Games Workshop Limited. Adeptus Astartes, Blood
Angels, Bloodquest, Cadian,
Catachan, the Chaos devices, Cityfight,
the Chaos logo, Citadel, Citadel Device, Codex, Daemonhunters,
Dark Angels, Dark Eldar, 'Eavy
Metal, Eldar, Eldar symbol
devices, Eye of Terror, Fire Warrior, Forge World, Games Workshop, Games
Workshop logo, Genestealer, Golden Demon, Gorkamorka, Great Unclean One, Inquisitor, the Inquisitor
logo, the Inquisitor device, Inquisitor:Conspiracies,
Keeper of Secrets, Khorne, Kroot,
Lord of Change, Necron, Nurgle,
Ork, Ork skull devices, Sisters of Battle, Slaanesh,
Space Hulk, Space Marine, Space Marine chapters, Space Marine chapter logos,
Tau, the Tau caste designations, Tyranid, Tyrannid, Tzeentch, Ultramarines,
Warhammer, Warhammer 40k
Device, White Dwarf, the White Dwarf logo, and all associated marks, names,
races, race insignia, characters, vehicles, locations, units, illustrations and
images from the Warhammer 40,000 universe are either
®, TM and/or © Copyright Games Workshop Ltd 2000-2011, variably registered in
the UK and other countries around the world. Used without permission. No
challenge to their status intended. All Rights Reserved to their respective
owners. |